Since I just finished the first modest time-lapse project myself, I thought I would share some of the different learning experiences I had to go through to as a time-lapse novice. This might be especially helpful for other rookies, who want to get into this very interesting and, to me at least, very challenging field of photography.
Equipment:
Besides digital camera, tripod, and "intervalometer" (mine is built into the Nikon D300 I have), you need lots of memory (you want to take hundreds, if not thousands of high quality pictures) and a "neutral density" (gray) filter I was told (to slow down the shutter speed and introduce some wanted motion blur). You also need software for the movie making, but let's come to this later.
So I did go shopping and bought a 16GB memory card as well as a Hoya NDx8 filter. The filter is not what Michael Rissi recommends in his blog, but the camera store I went to said they don't carry it in stock and would have to place a special order for it. I didn't want to wait and thought the NDx8 gets me started (reducing light by 3 stops). Eventually I want to get the ND400 and the 9 stop light reduction it provides. It will open a whole new world of day time long exposure possibilities.
Picture Taking:
What you obviously need is a good subject to take pictures of. Clouds, stars or sunsets seem always good for time-lapse photography and I originally wanted to go to the Toronto Islands one evening and capture the sunset over the downtown skyline with ferries coming and going in the foreground. I still want to do it, but for my first project I spontaneously decided to use the Vü condo construction site as subject. Since one of our daughters might move in there, I have always taken a special interest in the place, and I have taken lots of still pictures in the past to document the construction progress. I have also posted some of these pictures on the UrbanToronto blogging thread. So I thought that, if my project works out, I might want to post the resulting video on the blog and get a bit of exposure this way. Another reason for choosing the Vü was that I could take pictures of it from many different viewpoints and combine multiple image sequences in one movie, making it a real movie project. With the Islands of course I could also think of other viewpoints to combine into one Toronto Islands time-lapse theme: airplanes landing/taking off at the airport, sailboats coming and going into one of the marinas, different rides at the Centreville amusement park, embarking/disembarking of a ferry, Canada geese strolling in the park, inner harbour sailboat race, etc.
In time lapse photography you want to keep the camera settings constant within the image sequence. Since DSLR's usually do most things automatically and adjust to changing light and/or object distance, you have to know how to turn everything off and how to set it manually instead, of course creating the risk of getting it wrong. This means using manual exposure mode with an aperture setting ideally around f8 (creating just the right amount of depth of field), a shutter speed setting of something like 1/8 of a second (to introduce motion blur). Don't forget to turn off auto ISO and to set ISO to a low value, reducing "digital noise" (grainyness) as much as possible - on the D300 the lowest value is ISO 200. Also make sure that exposure compensation is set to +/- zero. In daylight all these "ideal" settings create an overexposure and that's why you need to put a neutral density filter on your lens. The filter acts like sunglasses without changing any of the colors (if you have a high quality filter). Two more things to turn off: auto white balance (if you save images as JPEG and not as RAW files) and auto focus. Set the white balance to match the light source and don't forget to focus the lens manually. Before starting the image sequence take a few test shot and make sure exposure, depth-of-field, amount of blur, white balance and focus are all what you want. You don't want to shoot hundreds of pictures over an extended period of time, only to find out later, that they are not usable, because you got one of the settings wrong. Having saved the images as RAW files gives you a bit more freedom, since compared to JPEG you have more possibilities to correct exposure and colour casts later during photo editing. What cannot be fixed later are pictures which are out of focus and you have to pay special attention to get this 100% right when you are still on location. Another warning concerns the gray filter. While it is necessary to use it during day time, be aware that in the evening, as it gets darker, the correct exposure requires shutter speeds that get longer and longer. If you are in a multi-second shutter speed range, this will not only reduce the number of pictures you can take in any given time-period, but it will also introduce more motion blur than what you really want. So don't forget to take off the filter when no longer needed. Depending on the light situation, you might also want to increase the ISO sensitivity to allow a bit faster shutter speeds.
So as you can see, there is a lot to think about and there is a chance you have to learn the hard way to get it right (as I did). You should really go through a checklist of how to set up the camera initially and then before starting an image sequence you have to always take test shots, then immediately analyze them and correct camera settings if needed. Check the histogram to see whether the exposure is right, review the image in full magnification to analyze sharpness (and depth of field) and noise. There is a nifty way to do that on the D300 by programming the center button of the multi-selector to toggle between high magnification and full frame in picture review mode.
Movie Making:
To turn your image sequences into a time-lapse movie you obviously need a computer and software. What I have is a Mac Pro desktop computer with 4 processors and 4GB of RAM. This sounds plenty, but still, I quickly ran into performance problems with it. Maybe I didn't use the right software, but I didn't want to spend a lot of money to buy video editing software, I don't know how to use. Instead of going the Adobe route, I used the tools which basically come for free on a Mac (once you have one).
What I did need to buy, is a $30 license for Quicktime Pro, to be able to turn an image sequence into a Quicktime movie. Once you have QT Pro the software is very easy to use, except that it doesn't perform that well on big image sizes, like the full resolution JPEGS a D300 generates. I had to abort multiple attempts, before I finally realized, that I should reduce the image size before handing the images over to Quicktime Pro. Now that was not what I wanted, because I did want to utilize the original resolution to later create pan and zoom effects with some video editing software as Michael Rissi proposed in his blog. Instead of using Adobe's Premiere Elements I was experimenting with Final Cut Express, which I had purchased, when I got the Mac originally, but then never used. Beside it not being very intuitive, I ran into issues that the imported Quicktime movies would render properly and that rendering itself was again very slow if the resolution was high.
I was about to give up, when I started to wonder, if I can use Photoshop to not only improve image quality and reduce image size in batch mode, but to also somehow create the pan and zoom effect with it. If used for an individual picture Photoshop gives me full control over cropping and sizing, and what I needed was an automated way to change the x, y and size parameters, while doing the batch operation. With Photoshop, the actions are static, applying the very same workflow over and over again. Thinking this over it dawned on me that Photoshop has also a scripting feature, which up to this point I thought was reserved for others and not me. Since I do have some programming experience from an earlier life, I challanged myself and digged into the Photoshop Java scripting functionality. Through many trial and error attempts I finally manged to create the script I wanted. It would go too far to explain it all, but I thought I make the script available for anyone who wants to try it and maybe even improve on it. Just save it as a .jsx file anywhere on your computer, and then load it with the Photoshop | Files | Scripts | Browse ... function. You get even a simple UI, which allows you to enter the parameters I thought of. This UI could be of course much more user friendly, but I am not a Java scripting pro and the script, as is, already does what I want. Let me explain.
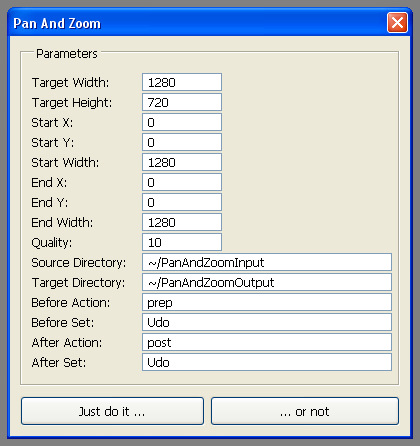 Target width and height default to the 720p HD format pixel resolution. You can change it to anything you want. Full resolution 1080i or 1080p HD format for example has a pixel resolution of 1920 x 1080. These parameters determine the size of the images created by the script.
"Start X", "Start Y" and "Start Width" determine ("keyframe") coordinates and size of where within the first image of the image sequence you want the pan and zoom to begin. The height is determined automatically by the aspect ratio given through the target width and height parameters.
"End X", "End Y" and "End Width" are analogously the coordinates and size of where in the final image of the image sequence you want the pan and zoom to end.
"Image Quality" determines the degree of JPEG compression of the saved image files. 10 gives you good quality (12 is best and 1 is worst).
"Source Directory" is the file directory in which your original unprocessed images are kept. "Target directory" is the file directory your processed images will be written to. Make sure they are not the same or the script will overwrite your originals.
"Before Action" and "Before Set" points to an action you can call before the actual cropping and resizing takes place. What I have done is for every image sequence I have taken one example image and then recorded under my personal action set "Udo" and with the action name of "prep" some initial editing steps I want to identically be applied to every image in the sequence. Here I change contrast, saturation, levels, curves etc. Do whatever you think helps the final image. I noticed also that Quicktime Pro for some reason brightens and reduces contrast of my image sequences. So I make sure here that I compensate for that upfront.
"After Action" and "After Set" analogously gives me the opportunity to apply some previously recorded action on the now cropped and reduced image before saving it. What I use it for is mostly sharpening, but you could for example introduce a also tilt-shift effect in this step.
With the buttons below you can either trigger the script or cancel it before it has even started. Please note that the script assumes that you are working with JPEG files, even though I am sure there is a way to automate RAW file as well. Note also that the script always goes back to the default values. I was too lazy to built in functionality to remember the last settings. If you want to abort the script while it is running, just press the Escape key until the action stops.
To make this more clear, here is an example. The screen capture only shows the default values I have chosen, which in fact will not cause a pan and zoom effect. You have to enter the coordinates and the width depending on what you want to achieve. For example if you have images with a size of 4288 x 2848 pixels (this is what my D300 records) and you want to create a 720p equivalent HD movie, your target width setting should be 1280 and your target height setting should be 720 (for 1080p you should change these values to 1920 and 1080 respectively). The aspect ratio (in both cases) is 16:9. If you want to create a diagonal pan and zoom-in effect starting from the upper left corner ending to the bottom right corner, you could enter for example:
- Start X: 0
- Start Y: 0
- Start Width: 3000 (which is about 70% of the image width)
- End X: 2688 (= 4288 - 1600)
- End Y: 1948 (= 2848 - 900)
- End Width: 1600 (which is about 37% of the image width)
The 900 is the implied "End Height" the 16:9 aspect ratio gives you for a 1600 "End Width". Note that for a 1080p equivalent movie the end width of 1600 is not big enough. In such a case you would want to enter for example
- End X: 1888 (= 4288 - 2400)
- End Y: 1498 (= 2848 - 1350)
- End Width: 2400 (which is about 56% of the image width)
The 1350 is the implied "End Height" the 16:9 aspect ratio gives you for a 2400 "End Width".
Did I confuse you now? I hope not. "Just try it ..." and tell me what you think. Before you try however make sure that your Ruler Unit is set to pixels (check in Preferences).
After the Photoshop action, you are now ready to create the movie in the two usual steps. First turning the image sequence into a movie (I use Quicktime Pro for that) and then if you have multiple clips and want to cut them and combine them with transitions, titles, music and other video editing goodies, you import them into a video editing software of your choice. I ended up using iMovie HD for that (why use the expensive complicated stuff, if you can have it easier and cheaper). Having made Photoshop do most of the work (be prepared that the script actually takes a while to finish depending on the number and size of images you are processing), the video editing was fast and without show stopper problems. It did take me some time to figure how to to get iMovie HD to actually create an HD movie in the format and quality I wanted, but I am sure you know better than I. Just don't forget to turn audio on before exporting and also remember to save the iMovie project from time to time. It is not unusual for iMovie to crash just before you have finished all your work and you can start the movie editing from scratch. Having it saved in a project allows you to recover quickly.
So here we are after I have tried to explain it all. For most of you it was probably way too much information, for a few others maybe not enough. I hope there are some of you out there, who this article actually helps to get started with this truly amazing photography technique. Good luck!
6 comments:
thanks for this Udo! The only part that is completely new to me is the scripting in PS. I understand the logic of it but I think it would take me some trial and error on the programming part. In the screen capture you included above, I do not follow what is supposed to happen - it looks like you are setting up to do a vertical pan but the starting and ending coordinates do not change?
I have made several brief movies in Windows with the included Windows Movie Maker. As with your eqivalent Apple software it is easy to use and has all the basic functions you need. My one complaint is that I would like to be able to layer different layers of video to make interesting abstract effects etc.
anyways, thanks again... I will bookmark this for future reference...
Redroom Studios.
Can you do HD video (1280x720, or even 1920x1080) with Windows Movie Maker?
Sorry for the confusion regarding the screen capture. It shows the default values I have chosen (which you can easily change in the script if you want). You are right, these defaults DO NOT cause any pan and zoom. You have to enter the coordinates and the width depending on what you want to achieve. For example if you have images with a size of 4288 x 2848 pixels (this is what my D300 records), you want to create a 780p equivalent HD movie your target width setting should be 1280 and your target height setting should be 780. If you want to create a diagonal pan and zoom-in effect from the upper left corner to the bottom right corner, you could enter for example:
- Start X: 0
- Start Y: 0
- Start Width: 3000
- End X: 2688 (= 4288 - 1600)
- End Y: 1948 (= 2848 - 900)
- End Width: 1600
hey man, thanks for this example you gave in your response and the added section in the tutorial above. It all makes sense now and I guess all I need to do is buy the intervalometer. Some of the videos I made use some sequential shots at my cameras 3 frames/ second but I think the most frames I have ever taken at once is 30 and that doesnt make a very long video!
I'm inspired for my next major project!
RRS
Thanks for this script! I have successfully used it to create some of my first timelapse with zooms and pans!
This is awesome! It works fine, but one hiccup. Sometimes (though not always) photoshop inprints the name of the file (when outputting the file) in the bottom right corner.
And idea what I'm doing wrong?
Thanks for posting this.
Wow! Amazing script! Very well thought out and I found it extremely useful.
Thank you!
I got the same thing as the anonymous poster above, found the part coding for that in the script and removed it with no adverse effects. Just wondering why that was implemented.
Also, if you ever think of improving the script, I'm running CS5 (not sure whether that makes a difference considering this was probably designed for an earlier version) and when I left the action boxes blank (i.e. I did not want to perform any actions) I received errors. I managed to delete those parts from the script but it would be nice to be able to select "no action" or something.
Massive thanks for this - simple, free brilliantly implemented solution!
Post a Comment